Waterslide Nail Decals
Nail decals are available as full nail wraps or smaller decals. Nail decals are also available in clear, or an opaque white base. Clear decals will allow the color underneath to show through, which may work nicely for light colors. White opaque decals will allow for full color range, including white. Smaller decals on white opaque should be trimmed to remove any extra material.
General Instructions:
- Paint nails as desired – a base coat in any light color will work, white will be best. Regular nail polish, gel polish, acrylic – any of these will work.
- Cut out the decal. Transparent decals can be cut very loosely. Cutting slits in the side of the decal may help the decal sit flush on the nail.
- Dip the decal into lukewarm water, leaving it from 10-20 seconds. If it won’t slide off easily, leave it in the water for another 10 seconds.
- Slide the decal from the backing.
- Apply decal to nail. Apply decal close to cuticle, but allow a small gap to prevent lifting.
- Gently smooth the sides of the decal. The decal may be fragile, so do this step carefully and gently!
- If there is excess decal at the sides, tips, or base, use a brush dipped in acetone (or nail polish remover) to break it away.
- Ensure any remaining water, under or over the decal is dried.
- Seal the decal in place using regular topcoat or gel topcoat. Ensure that the edges and tips are painted. **Feedback from our testers has let us know that a “quick and dirty” is the best approach here. A quick, thin layer of topcoat will seal the decal, using only a few strokes. After the first coat, another can be added if desired. It is best NOT to use old or “goopy” topcoat – we have found that Sally Hanson Diamond Nails topcoat seems to work really well.
- Enjoy your gorgeous new nails!
Waterslide Decals
Waterslide transfers are available in clear or white opaque. If you have a DARK surface you want to apply a decal on, then a white opaque decal is the best choice. If you have a light surface, clear will work well. The only difference between the clear and opaque is that the opaque will need to be carefully trimmed to size.
Essentially, these are the same as nail decals – but bigger. You can follow the same steps as you would for applying decals to nails – except for – you know – the nail polish part!
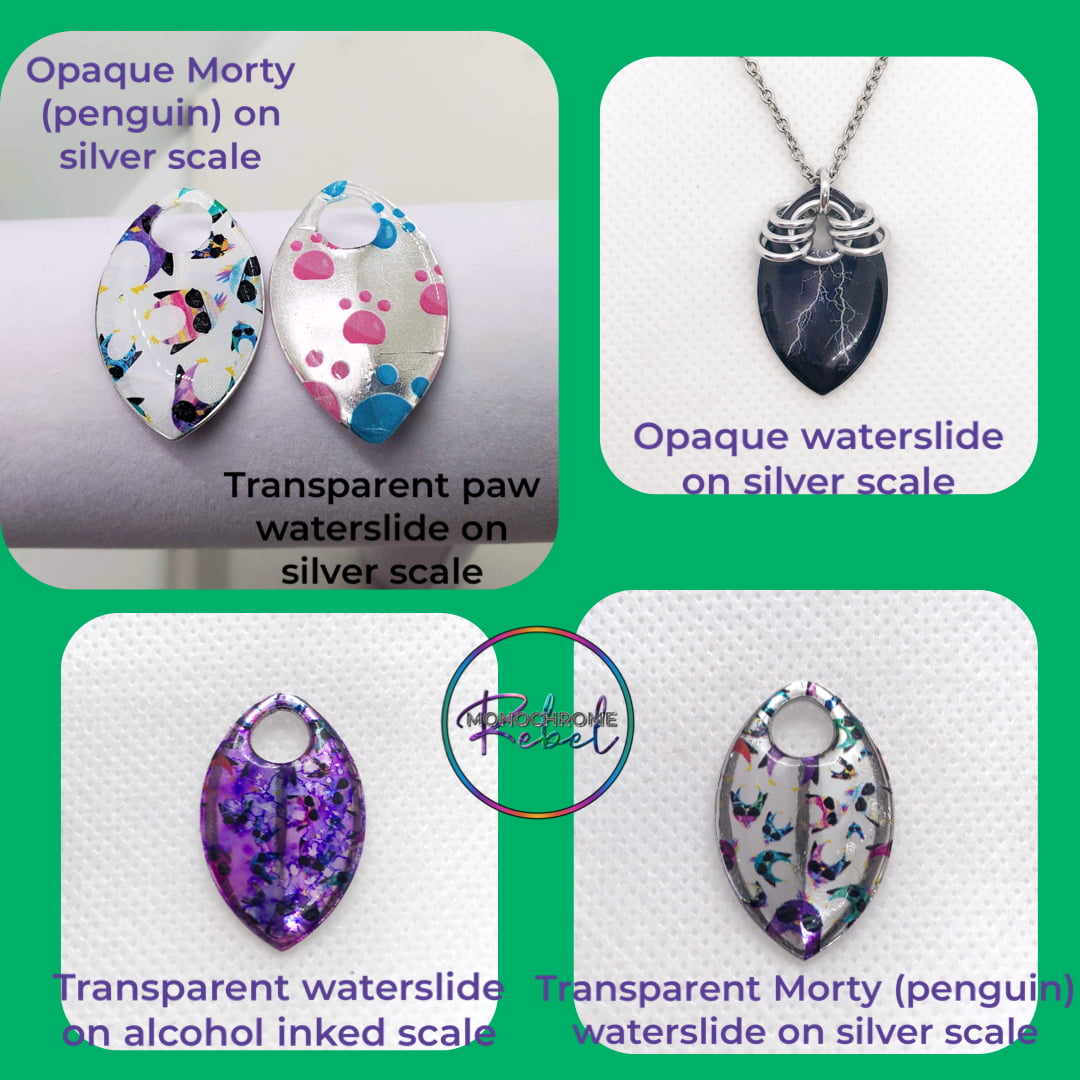
Opaque vs Transparent Waterslides/Upscales
Upscales - Tips and Lessons Learned
- Application is very similar to waterslide nail decals. In short:
1) Cut out.
2) Dunk in lukewarm water.
3) Slide decal onto scale.
4) Flatten, remove wrinkles and bubbles, let dry.
5) Trim edges and hole.
6) UV resin coat or spray coat.
Here are some tips and tricks we’ve learned, because we tried everything we could think of – some things worked, some didn’t!
Cutting Out:
- Opaque waterslides are best cut as close to the line as possible. While you CAN trim the edges later, it’s just easier to line them up to the edges.
- Transparent waterslides can be rough cut and trimmed later OR can be trimmed as close to the line as possible. Depends whether you’d prefer to cut out or trim later.
Holes:
- BEFORE applying your waterslides to your scales, either PUNCH a hole near the hole in the waterslide, or CUT an X into the center of the hole. While you can put a hole in after, it’s a lot easier to do at this stage.
- The holes are not the same size as the scale, because the hole isn’t a consistent location. They’re just a guideline of where the hole will be.
Applying Waterslides:
- Lukewarm water is best. Cold takes longer. Hot water just doesn’t feel good to dunk your fingers in!
- Your waterslides are “ready” when they pull away from the backing paper EASILY. You can watch and see the edges start to pull away from the backing in the water, or take them out and test them.
- You can give the waterslides a gentle rub between your fingers and see if they separate easily. If they don’t, throw them back in the water for a little longer.
- You can remove the entire waterslide from the backing and apply to the scale, or my preferred method is to slide it directly from the backing onto the scale.
- The BEST way to get your scale to adhere well and to prevent wrinkles and bubbles is this: Once your scale is lined up the way you want, find a soft, DRY cloth. Fold up and place a few layers over your scale. Press on it with your hand/palm. This will both flatten any wrinkles, push out air bubbles, and soak up any excess water. It also tends to make the waterslides adhere better during the edge trimming process.
Trimming Edges:
- The best way I’ve found to trim the edges is using a nail file, anywhere from 100 grit to about 300 grit. Use the nail file PERPENDICULAR to the edge of the scale, and file DOWNWARDS, so that you’re not causing the waterslide to peel.
- You can trim your edges before you seal, but you’ll have to seal the edges after – or you can trim before sealing – but keep in mind that prior to sealing, the waterslides are much more likely to peel from the scale. Both methods work.
- You can also use acetone on the edges to clean them up.
Trimming Holes:
- The easiest and most efficient way to deal with the holes is using acetone. Acetone will dissolve the waterslide and leave you with clean edges. Dip a Q-tip in acetone, shake off any drips, then put the tip of the Q-tip in the center of the hole. Apply GENTLE pressure and give it about 10 seconds. The Q-tip will dissolve the waterslide and go through. Rotate the Q-tip gently around the edge to remove any remaining waterslide.
OOPS! I MADE IT PEEL!
- Don’t panic. All is not lost! You can slightly moisten the edge and stick it back down.
- If you’ve caused this during trimming the hole, and made a tear in the waterslide, don’t panic! You can moisten it and stick it back down. You likely won’t be able to see the tear, and even more likely, it will be covered by a ring!
- We prefer to use UV resin. It’s shiny, tough, and surprisingly easier to use than we even imagined. And it’s not very expensive if you just want to try it out.
- I squeeze the resin directly from the bottle onto the scale. Less than a dime size amount. I use a toothpick to push the resin ALL the way to the edge.
- A toothpick or bamboo skewer will work to push your resin around, drag bubbles to the edges (where they disappear) and to smooth resin around the edges.
- You 100% want to SEAL YOUR EDGES. I dip the end of my toothpick in the resin on the scale and “paint” around the edges with it.
- If you don’t have a UV light, or your nail light you thought would work turns out to be wimpy (ask me how I know!) – all is not lost. Put them on a window sill in the sunlight. How long? Until they’re not tacky. If they’re still sticky, just leave them for a while longer.
- Spray sealing also works – Krylon sprays are the best we have found. Spray well, and ensure you spray the edges. We recommend 2 or 3 coats.
MISCELLANEOUS ADVICE and LESSONS LEARNED (probably the hard way)
- If you’re holding onto the scale with your fingers while sanding the edges, the waterslide might want to stick to your finger. A pair of cotton gloves or even just holding the top of the scale with a fabric-covered finger (fabric bandaid, even) will stop that from happening.
- You can’t “paint on” the UV resin. It just doesn’t work. I tried. The resin will pool where it wants to, and it will have missing spots. Make sure you have enough resin to “dome” the scale.
- Basic logic says not to soak them in water, or freeze them or heat them – engineer nerd will tell you that they have different coefficients of expansion and it might make them separate 🙂
Stickers
Stickers are available with multiple options. White, matte paper stickers can be applied as-is, or they may be colored! These are also good for to-do list stickers and in journals and planners. White glossy stickers may be more difficult to write on, but have a beautiful shiny finish. Clear glossy stickers will allow your background to show through – but are best used on a white or light background. Some weatherproof stickers are also available – these are great for areas that will be exposed to some water.
Tattoos
Tattoos are skin-safe and kid-friendly. Tattoos will last anywhere from 3-10 days, depending on placement and washing.
Art Journaling
Transfers for T-Shirts/Fabric
These can be applied to cotton, polyester, etc. They can be applied using a heat press, easy press, or conventional iron. Best results will be obtained from a heat press, but a conventional iron will work. Transfers will require cutting around edges.