Posted on Leave a comment

Substrates and Transparency and Print Types – OH MY!

If you’ve ever wanted to create tumbler or pen wrap with a dark background and bright image – you know how hard it is to get a transparent decal to show up on a dark background. So how do you get your waterslide or decal to show up on a dark background?? Or maybe you have a seam that you need to cover, or a scratched up surface that you want to hide? In that case, a white opaque waterslide or sticker might be the perfect solution. No matter what you want to create, we can help!

So, you’ve come to our website because you want that design you saw. It might have been Upscales, could have been a pen wrap, maybe it was a tumbler wrap. Then you saw all these options and you got excited (and maybe a bit confused!) Which one do you need and why do we have all of them? Because we think you should be able to make whatever you want, however you want! It’s a good thing you’re right here, for this post, because this is where we explain it all.

Substrates – Waterslides and Stickers in Opaque and Transparent


First up, let’s talk about substrates. Currently, Monochrome Rebel makes products on waterslide and sticker substrates.

Waterslides


Waterslides are opaque white or transparent and come as a shiny surface on a paper backing. You soak that product in lukewarm water for a minute or so and the printed part “slides” away from the paper backing so that you can apply it to scales, pens, tumblers, mugs, coasters, etc. Keep the waterslide and your surface wet and you can move them around easily to get them in just the right position. Waterslides have a slightly tacky underside and will cling to the surface you apply them to. When dry, they have a slight stick but can be peeled up or rewetted. This is not an infinite process, however. Continued rewetting and peeling can damage the waterslide and render it unusable if not handled with care. (See them applied here and see our How Do I page for more info)

Waterslide

Stickers

Stickers are, well, they’re stickers! Paper, vinyl or polyester with an adhesive backing, we make sticker products in opaque white and transparent. We also offer certain products on holographic and glossy white sticker stock (Upscales
people, we’re looking at you!) Peel the product from the backing paper and apply it to scales, pens, tumblers, mugs, coasters, etc. Smooth down carefully to prevent bubbles. These are not activated with water but all of our stickers, other than our matte white products, are water resistant.

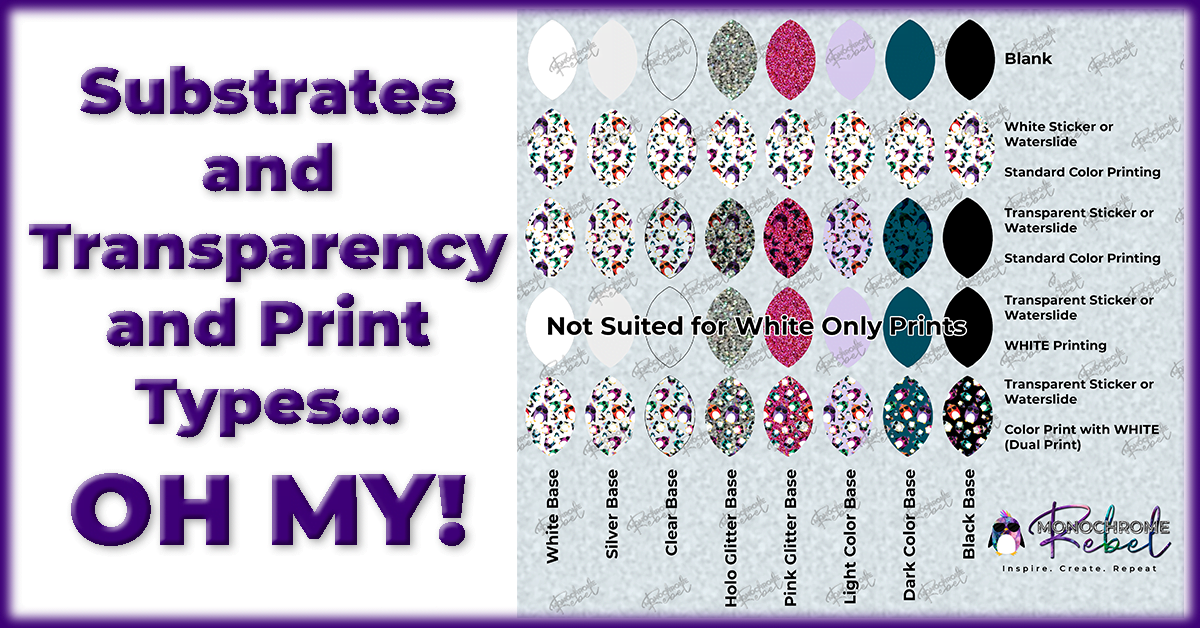
Now let’s talk about the different types of print. We use laser printers and offer standard print, white print and dual print.

Standard Color Prints

Standard print is the kind of thing you see every day and the picture below is a great illustration. All the colors possible to print – with the exception of white. Standard print is suitable for white and transparent substrates. Many of our holographic prints are standard color as well. Standard print on transparent looks great over lighter backgrounds, fades a bit over medium tones and is all but invisible on dark colors.

Paisley print on various substrates

White Prints

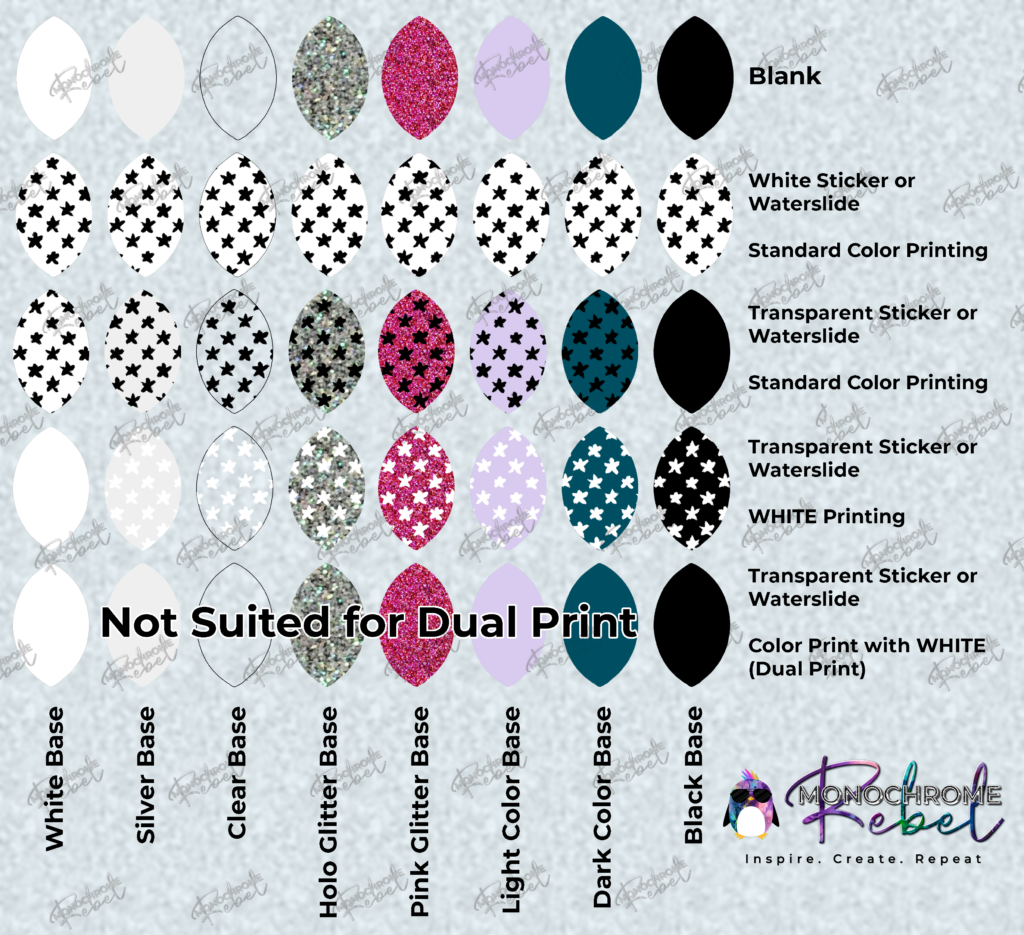
White print, which we sometimes refer to as white-only print for the sake of clarity, is precisely as it sounds – white toner printing. White print is only available on transparent or holographic substrates. Our white print is opaque and shows up beautifully on medium and light tone backgrounds but can often get lost on light backgrounds. The next picture illustrates this point really well.

Sketchy stars – available as standard black print or as white print

Dual Prints

Dual print is where the magic happens. This is where you can put ANY design on ANY background! Dual print is a Monochrome Rebel term, not an industry-standard term. It is our term to describe our method of creating full color prints, on transparent substrates, that will show up beautifully over any background. When you want to use dark colors of scales, glitters, and inks and you want something detailed and colorful to show up on top of it, you want dual prints. The next picture shows our Morty print and the bottom row is dual print on various backgrounds. (There are times when dual print on holographic is available and our listings will tell you why when it’s an option.)

Morty Mania! – available as color prints on white OR transparent substrates.

We hope that this has been helpful for anyone wanting to understand our
product details. Please feel free to comment or message us on the site if you have any further questions or need clarification. We appreciate your time and your business. Happy Making!

Share This Post:

Posted on Leave a comment

Using Custom Seamless Designs – Creating Your Own Patterns

You’ve bought yourself a fancy, new, seamless pattern. Woohoo! ….umm…..now what?

(What?!? You don’t have yours yet?? Get your own here or here or here!)

In any graphics program, you can simply copy and paste the images beside each other. They will match up at the edges perfectly and you won’t have any overlap. Easy peasy. (This will work in Photoshop or Elements or Inkscape or Illustrator or even Paint!)

If you have Photoshop (or Inkscape – the process is similar), there’s a nifty little trick that can help you make magic 🙂

Define Pattern

If you open up the seamless pattern, and then go to Edit and Define Pattern… and then give it a name.

Edit -> Define Pattern…

This means that Photoshop will recognize this as a pattern and can tile it for you, with a few extra tricks.

Create Pattern Layer

To use your pattern, you can create a Pattern layer, using Layer -> New Fill Layer -> Pattern

Layer -> New Fill Layer -> Pattern

Give it a name, and then you will see the pattern options. Clicking on the box or drop down that shows the small image will give you the list of patterns. Your new pattern should be in here! You can also adjust the scale which will increase or decrease the size, and the angle, which can rotate your pattern.

Because you created a pattern fill layer, it will automatically include a mask layer… If you know how to use it, go for it. Otherwise, that’s a lesson for YouTube or another time! 🙂 If you rasterize this layer, you can treat it just like any other layer.

Fill with Pattern

If you create shapes in Photoshop (or Inkscape), you can fill them with a pattern. After creating the shape, select the Fill option, and select the Pattern option. Then, your list of patterns will show up and you can select your new pattern!

Taadaa!

That’s all for now! Hope this gets you started in your adventure!

Posted on Leave a comment

Cat or Dog?

You know that joke about a dog and a cat, where you get to see the thoughts of the cat and dog, as time goes by? Dog’s journal entry and cat’s? And the cat’s begins with “Day 938 of my captivity…

As this pandemic goes on…I start to feel more like the cat… My toddler is quite happy to build forts and play cars, day in and day out…but man, I got bored of that after the first week!

Even though there’s nothing much time left in a day after dealing with the various toddler demands, art still feels good.

I sat down to color with my kid, and dutifully colored his pictures with numbers and objects to count. And then I flipped the page over. It’s been MONTHS since I tried to draw anything. I wasn’t even sure I still could!

If that sounds ridiculous, let me back up a bit. I was one of those people who swore up and down that they were utterly incapable of drawing. Not people, not anything. My attempts didn’t even LOOK human. So I stopped trying. I don’t like failing.

Earlier last year I decided if I was going to be at home, I should at least learn to do something. I started off painting with watercolors, cuz even watercolors look good if you just make a mess! But I soon got tired of the limitations when I saw so many people who COULD draw. I signed up for some art classes with Karen Campbell, and I amazed even myself. I COULD actually draw! Who knew?!

Anyhow…all this to say… it doesn’t matter when (when it REALLY should have been bedtime), where (sitting on the floor at the coffee table), or with what supplies (back of a printed counting sheet and a couple crayons)… Doing art just feels good. And if you give yourself permission to put ANYTHING on the page, you might just be able to let some circling thoughts free 🙂

Posted on Leave a comment

Welcome!

Monochcrome Rebel began as the answer to the question “Why is everything out there pink, flowers, butterflies, perky, and religious? What about the rest of us?” (not that there’s anything wrong with those – Kasey likes pink, and I like butterflies just fine…)

While those “Mama Bear” or “Wine-o-clock” shirts out there are cute – we’re over them. We want something new. And edgier. Something that better reflects more than just a segment of the population. Something REAL. So we began to create what WE wanted to see.

Some of it might not be everyone’s cup of tea, and that’s just fine. If everyone liked it, it wouldn’t be very interesting, would it? We also wanted to make art, and help other people create their own art that better reflects real life. Life is many things – it is wonderful, it is beautiful, it is loving, it is joyful…but it’s also hard, and frustrating, and disappointing, and heartbreaking. I believe life is meant to be lived the same way I like my art – with ALL the colors, and ALL the emotions. Not just the good ones. I happen to believe that one of the best ways of dealing with the hardest parts of life is to examine them, to identify the emotions, and to NAME them. And then give the ones I don’t want to keep a solid boot in the ass. Because I have living to do!

In my art journals, there’s really not a lot of “find the good in every day” type quotes – I use my journals to get my emotions out. And there’s a lot of less-than-pretty stuff in there! (And yes – some of it is because my drawing skills are mediocre, and some of it is content! The good news is my digital art skills are better!! LOL) But I found that there wasn’t much available that suited what I wanted (and needed) to say. Even more important – my drawing and lettering skills seemed to be limiting what I felt I COULD put on a page. I’d show you a picture of one of my early early pages, but it’s the internet, and it’s around forever – and it’s MORTIFYINGLY bad. But here’s a perfectly mediocre page I did. But the most important part? I enjoyed the process.

And this one? This page just FELT good. It felt good to create, it felt good to get color on the page, and it felt good to let it out!

And the nail decals? Well…once I found out I could make all the nail decals I ever wanted…I had to make them!